Hello guys welcome to Birds in Tech, hope you're having a great day, in today's article I'm gonna write on how to install Alpine Linux Desktop On Android, this one os a simple and a straight forward tutorial, stay with us till the end and you should have Alpine installed On your Android phone in a matter of Minutes.
Prerequisites :
What is Alpine Linux
Alpine Linux is a security-oriented, lightweight Linux distribution based on musl libc and busybox. Alpine Linux is a Linux distribution designed to be small, simple and secure.
Procedures To Install Alpine Linux On Android
After installing termux the next thing you're going to do is update your termux packages, you can do that with the command:
- pkg update
After that we're going to install proot-distro, as proot-distro is the Linux distro we're actually going to be using to install Alpine Linux, you can install proot-distro with the command:
- pkg install proot-distro
Now we proceed directly to the installation of Alpine. To install Alpine is pretty easy, and you can do so with the command
- proot-distro install alpine
The distro is lightweight and should be installed in a matter of seconds, after successfully installing Alpine, you can login to Alpine with the command:
- proot-distro login alpine
As it is with all of the Linux distros we've previous installed, after installation the first thing you do is update their repository to guarantee proper function as well as complete usage of all of its features, you can update Alpine with the command
- apk update
If you wish to add a user account to your Alpine Linux then you should follow the set of instructions below and if you don't, you can skip to the desktop installation process Below.
Add A User Account on Alpine Android
The first thing we're going to do is Install sudo nano as it plays a big role of letting us gain access to sudo permission on the user account, you can install sudo nano with the command:
- apk add sudo nano
After sudo nano has been installed, you can now add your account by using the command
- adduser username (e.g) adduser bird
You'd be required to enter a password and verify that password, after that. Make sure you use a password you can always easily remember.
After successfully creating that user account, you're going to add the new user to the sudo group, we're going to manually add this, so they do that, typed the command:
- nano /etc/sudoers
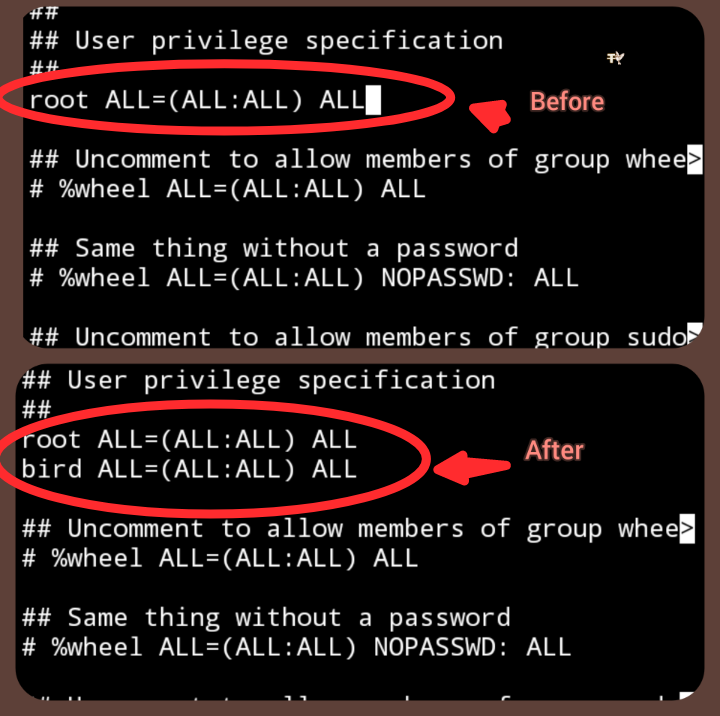
In the #user specifications comment you're going to paste your username below the root user just as shown in the image below
- username ALL=(ALL:ALL) ALL
You can sign out of nano editor by typing Ctrl + o to save and Ctrl + x to exit.
After giving your account the users privilege specification you can login to your user account by using the command:
- su username
And after that if you type in the command whoami you should have your username as the answer . Now let's proceed to desktop installation
Desktop installation
Now to the desktop installation process, which is the important part, for this article, we're going to be using the plasma desktop, you can simply install it by using the command:
- sudo apk add plasma
That should take a little bit of time and storage space of about 1.4 gigabyte.
Now we install firefox and a graphical terminal to Alpine before logging in to the vncserver, to do that use the command:
- sudo apk add konsole dolphin firefox
Now that we're done the next thing to do of course is connecting to the vncserver. I personally do not recommend logging in to vncserver using the remote vncserver Mainly because all the VNC clients on remote servers I’ve tried so far don’t have perfect experience, so we're going to login using a TCP server, to do that, switch to a new terminal and follow the steps as described below.
so on your termux terminal 2, type the command :
- pkg update
then we install the x11-repo using the command:
- pkg install x11-repo
the next thing you're going to do is install vncserver using the command
- pkg install tigervnc xorg-xhost
you're going to be required to create a new password, create any 6ix digits password of your choice. After that we're going to launch vncserver using the command:
- vncserver -geometry 1600x720 -listen tcp :1
then we disable access control using the command:
- DISPLAY=:1 xhost +
Now you should get a message that says access control disabled clients can connect from any host.
You can now switch back to your Alpine terminal and then connect to the TCP protocol using the command:
- DISPLAY=:1 plasma_session
Login through your vnc viewer and that is pretty much it.
You can disconnect from the server at anytime using the command
vncserver -geometry 1600x720 -listen tcp :1 -kill :1
Watch the video here:
Tags
Alpine
Alpine Linux
android apps
android studio
Android Tutorials
Debian terminal
ethical hacking
Linux desktop
Linux terminal
Mozilla Firefox


