Welcome To my Blog, this article was written to guide you on how to fix the phantom killer 'signal 9' error on termux, read the article till the end and use the commands as pasted below, to avoid making mistakes while on the process of doing this, and also it is advised that you also get a visual guide by watching the video that was made on this particular topic below. 👇
Procedures To Disable Phantom Killer
Below are the important procedures to follow in order to disable phantom process killer.
1. Update Termux and install Android-tools :
On termux, update your terminal and install a package called android-tools, do that with the command below.
apt update ; apt install android-tools
2. Enable Developer Options :
After completing step 1, launch your settings application and turn on Developer Options.
to do that :
i. Locate Build Number on your settings : it is often found at the device information page ' and you can alternatively just search for it using the settings search barii. To turn on Developer Options, click on the Build Number till a notification that says you are now a developer pops up on your screen. Often at times you'd have to click on the screen 7 times
3. Turn On USB And Wi-Fi Debugging :
I. Now that you have completed step 2 'open your settings search bar and search for Developer Options, then click on it in the menu that pops up.
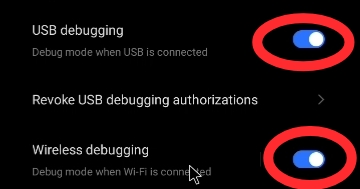
II. On the developers page : scroll down the menu and locate USB Debugging and turn on the toggle.
III. Now connect your phone to any Wi-Fi device of your choice. This is important for the next procedures.
IV. Once you're connect red d to a Wi-Fi network locate Wireless Debugging and turn on the toggle also.
V. Put your settings application on Split-screen mode. let Settings be on one part of the screen and Termux on the other. If you get an error that says 'settings app does not support split screen' click here to learn how to fix that.
I. Now that you're done with step 3, click on the Wireless Debbugging option and it should direct you to a new page.
II. In that page, locate the option menu that says 'pair device with pairing code' click on it. And a pop-up displaying a pairing code and your WiFi's IP address with it's port number should come up.
III. Now on the other part of the screen which is termux, type in your command using the format example below.👇
- adb pair ip.address:portnumber
e.g.
adb pair 10.93.218.121:45665
IV. After entering that command, you'd be asked to enter the 'pairing code', enter the code displaying on the settings screen. e.g. 037551
5. Connect Termux To Wireless Debugging
To connect Termux to wireless debuggin's IP address and port number, use the command format below.
- adb connect ip.address:portnumber
e.g.
adb connect 10.93.218.121:34573
6. Permanently Disable / Change Phantom Process Default Value.
To do that simply copy the commands below one after the other.
I.
adb shell "/system/bin/device_config set_sync_disabled_for_tests persistent"
II.
adb shell "/system/bin/device_config put activity_manager max_phantom_processes 2147483647"
III
adb shell settings put global settings_enable_monitor_phantom_procs false
Conclusion :
By correctly following all of the procedures above, phantom Process Killer will be disabled from your Android Phone And the Signal 9 problem should occur no more. In case of any error reach out to me using the contact form or the comments section below.


